Sunday, May 17, 2015

Flankstrami

Oy Vey not another Pastrami post but this one comes with a twist. I am using Flank-Steak. What? Flank-Steak? Isn't Flank-Steak Flat? Well yes it is but we are going to transform it into a cylinder using Transglutaminase. If it was me reading this POST I would ask the question WHY? Well why not. All meat taste better when it's been Pastramified.

Using my Pastrami Recipe (Link) makes this very easy. I have done this many many times before but on larger pieces of meat. This cut will only take about 7-10 days to cure. First things first.....I pierced the meat all over using a Jaccard  which will help with the absorption of the cure.

Combine salt and Cure #1 and rub into every nook and cranny. Simple wasn't it?

Take the rest of the ingredients except ginger, garlic and sugar and heat in skillet to bring out the oils. Grind through an electric spice mill and rub into every nook and cranny. 


All vacuumed sealed and curing......7-10 days or so. 
Note: Meat weighed in at 1832 grams.


Meat all rinsed off and dried after 10 day cure. I also used a meat pounder to flatten them out a bit. I wanted the Flank steaks to be the same thickness.


I will do my best to describe the next step in detail. Lay out parchment paper on a very large surface (I used my pro-cutting board). I placed the Plastic Wrap Box on one end of the counter and pulled the plastic wrap (24 inch wide) out to the other side. I then sprinkled Transglutaminase aka TG on the plastic wrap. The TG is a protein binder and it will help the meat form into one solid muscle. Rolling it up tight will ensure a good bond. I also covered the meat with TG too as you can tell by the picture. Using the plastic wrap as my sheath I rolled the meat up into a tight cylinder rolling if many many times until the seal and cylinder were very tight. I tied off the ends with rope. 


Roll it up tight using a very tight grip. 


Rolled up very tight. If there are any air bubbles just use a toothpick to pop them. Use butchers twine to secure ends. 


Vacuumed sealed to secure shape. It will take 24 hours for the TG to bond this into one solid muscle.


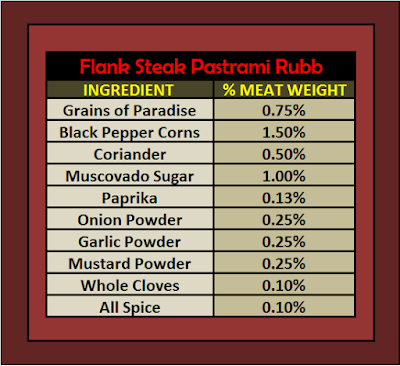
After 24 hours I will remove meat from refrigerator and unwrap. Yea I might have forgotten to tell you in the previous paragraph that refrigeration is important. Now it's time to for the cold smoke. I will spray the cylinder with Pam canola oil which will help the rub adhere. This rub differs from my other one with the addition of Whole Cloves and Allspice. I wanted to make sure that the Pastrami flavors would come through this large hunk of meat. 

This is what the meat looks like after a 36 hour bonding with TG. Beautiful isn't it? Yea that's a rhetorical question because I know it gorgeous. Now on to the Rub.


I sprayed the meat with a little Pam Canola oil to make sure rub would adhere. Roll your meat all over the rub to achieve a good coating. 

All ready for the cold smoke. I am using the A-MAZE-N cold smoker tray to pull this off. 


After 8 hours of cold smoking this thing has the makings of a great Pastrami. 


All Vacuumed sealed and ready for Sous-Vide Machine. To ensure core pasteurization the Pastrami will SV cook for 9 hours at 133 degrees. 
Pastrami was SV for 9 hours and given an Ice bath to cool it off rapidly so I could refrigerate overnight. Ice-bath??? Plunging the vacuumed sealed meat into a container filled with ice and water. I plan on giving it a touch of Hot Smoke to secure the bark and increase the smokiness. This is what it looks like after a 30 hours of refrigeration. 


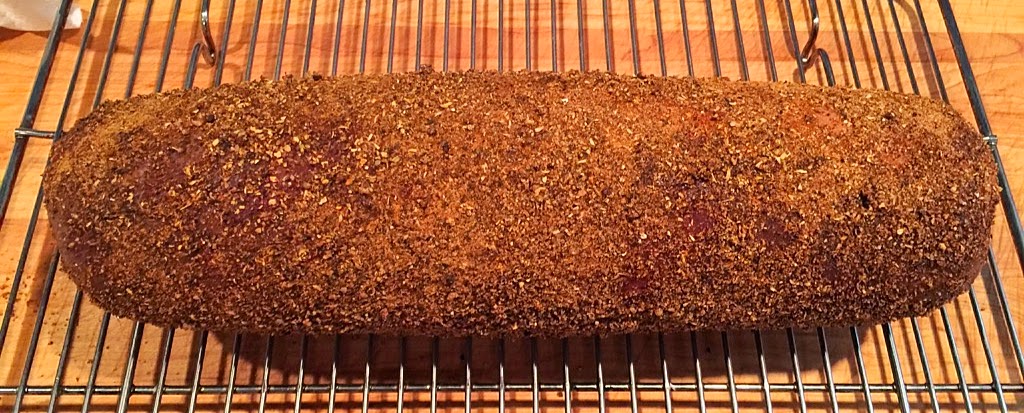
Ok....I sprinkled on some course black pepper to add more of a peppery profile to the pastrami. It will be HOT-SMOKED at 200 degrees for 80-90 minutes.


80 minutes later this is what it looks like. Bark perfect!!!


Look at these gratuitous pictures. The ends are perfectly shaped. Would you have guess this was flank-steak?


REVIEW AT THE BOTTOM  


My review!!! Perfect, I will not change a thing. The pastrami flavor was intense and throughout the piece of meat. I think the reason is I was able to cure thinner pieces of meat and the cure really penetrated.


Friday, May 1, 2015

MAPLE BACON RECIPE


This is an optional ingredient called Bacon Taste Booster which increases the Bacon Flavor. Just add .38% to the Salt and Cure #1 and rub it into your Belly. 

NOTE: 7% seems like a lot and it is but all you really need is enough to cover both sides of the protein when it's vac sealed. 


This is my all-time favorite Bacon Recipe!!! This is my base recipe to add too. From here you can make it savory or whatever by adding to the above recipe. 

Something I love to do is add smoked pepper or regular pepper to the bacon prior to the smoke. You can add anything you want. I also love adding Maple Sugar too and sometimes orange zest or dried peel. The only limitation you have is your imagination. 


"NOTES ON CURING"

Us Metric Conversion Spread sheet

INTERACTIVE SPREAD SHEET


BBBB~BLT

Why I use Dextrose for my Bacon...

Chemical action of curing
Salt inhibits the growth of spoilage-causing microorganisms by drawing water out of microbial cells through osmosis. As the unwanted bacterial population decreases, other beneficial bacteria, primarily of the Lactobacillus genus, come to the fore and generate an acidic environment (around 4.5 pH). The sugar included in the cure is used as food by the lactobacilli; generally dextrose is preferred over sucrose, or table sugar, because it seems to be more thoroughly consumed by the bacteria. This process is in fact a form of fermentation, and, in addition to reducing further the ability of the spoilage bacteria to grow, accounts for the tangy flavor of some cured products. Concentrations of salt up to 20% are required to kill most species of unwanted bacteria.xxxSmoking adds chemicals to the surface of an item which affect the ability of bacteria to grow, inhibit oxidation (and thus rancidity), and improve flavor.

"Ottomans Basturma"


Ottoman's Basturma is my playful quizzical name for this highly seasoned, air-dried cured beef. While researching different kinds of cured meats and styles I came across Basturma, also called Bastirama or Pastirma. 


Hmm...I thought to myself with names like this there must be a bloggable story behind this cured meat. 

Why did I call this Ottomans Basturma? The Air-dried beef was universally consumed and loved by the former Ottoman Empire so I thought it fitting to call it Ottomans Basturma. This cured meat has a very old beginning. Before there was Prosciutto, Pancetta, and Bresaola there was Basturma. Name any cured meat and I am sure Basturma predates them all!!!!


Here is an interesting little tibbit (at least I think so) about the region (What was known as the Ottoman Empire). The region had many different versions of Basturma and although some of the names were different the recipes and techniques were very similar. Even the Jewish people call it  pastirma or pastrómeh in Yiddish. Not to be confused or compared with Pastrami. Yea, yea I know what you are thinking so stop it. This is not a old version of Pastrami. 

Like I said the Basturma or Bastirma is 
infamous far and wide in the region with names such as pastërma in Albania, basterma in Arabia‎, basturma in Armenia, basdırma in Azerbaijan, pastirma in Bosnia, Croatia, Macedonia and Serbia, pastărma in Bulgaria, pastourmás or pastroumás in Greece, and pastramă in Romania. Everyone has their own version and claim origins and superiority. I have come across some lively debates in forums that argue the about this cured piece of meat. 

What exactly is Basturma? Traditional Basturma is made by salting meat, which is then washed with water and dried for about 10-15 days. Salt and blood is pressed out of the meat and it is covered with “Cemen also called Chaiman”, a cumin paste made by combining crushed cumin, garlic, hot paprika, and fenugreek. The meat is thoroughly air-dried. The variety of paprika being used, determines the spiciness of the dish. It's worth noting that in the Ottoman Empire, the craftsmen from Central Anatolia specialized in the art of preparing and curing Basturma. BTW- Anatolia is in Turkey where they still claim to be the ones that came up with this cured meat. 

I found this meat so intriguing that I ordered it online from several places so I might get acquainted with this highly seasoned cured meat. If I was going to make my own version of Basturma I might as well taste it from different places which of course claim theirs is the best and the original. I think it's obvious that any attempt at making this cured meat without first trying it would have been foolish. How can I possibly make something that I haven't tried. This is liken to someone making Jewish food from a recipe. They have no idea what it tastes like, looks like but they think they can make Jewish food. From my experience this usually ends in failure or just a very poor attempt. Not me!!I Tasted my share of Basturma and I think I can make it with modern curing techniques. 


So let's begin with the post. So I decided to use a Loin of Beef for my Basturma because it's tasty and tender. Most of the recipes I have seen use this cut of beef but have seen eye of round and Filet too. The whole thing weighed in at 6618 grams and after trimming, it weighed 3871 grams. Yea that sound like a lot of waste but not to fear I am going to use the trim of sausage. 


They say a picture is worth a thousand words but in this case it's worth 41.75% loss in overall product. 


Instructions and Dry cure notes


If you can weigh ingredients and can do some easy math this recipe is fairly easy. First pre-measure the salt and cure. Combine together and thoroughly coat Loin getting it into every nook and cranny. Simple wasn't it? 


If using whole All Spice grind it up using a spice mill. Same thing with the Grains of paradise. Combine everything together and coast meat thoroughly getting it into every nook and cranny. Place everything into a vacuum seasonable bag and refrigerate. Flip Loin every day for 21 days. I am using an equilibrium cure and it's really not possible to over cure and I know from experience that this meat needs about 3 weeks to thoroughly cure. 

The picture to the left shows the Loin freshly out of the bag smothered with the cure. The picture to the right is the Loin all rinsed off. 

I added a rub to the steps because I wanted to impart more flavor. This Rub is similar to the cure I used. 

Traditional Basturma cures the meat with salt then applies Chaiman.....blah blah blah...what I said above. If you notice I gave my version a double whammy. This is my way of replicating the process but putting my own little spin on it. I cured the meat with salt and Cure #2 and covered the meat with the traditional spices. After the meat was cured I applied the above rub. How did I come up with the Spice %? I kept tasting it until I liked what I tasted!!!


PIC 1- IN UMAI BAG

For the dry aging I am using the UMAI bags. This works great if you don't have a dry curing chamber. The meat will sit in the refrigerator until a 30%-35% weight loss has been achieved. On 2/27/15 it weighed 3850 grams. It will lose 30% of its weight which is 1155 grams which brings it down to 2695 grams.  Note: I keep a bowl of salted water in the refrigerator to increase humidity.


PIC 2- JUST CAME OUT OF UMAI BAG


On April 8 it weighed in at 2495 just a hair above 35%. I should have weighed it sooner but time got away from me. 35% should be perfect though. 


PIC 3-VACUUM SEALED


The Basturma is now vacuumed sealed in a regular bag and will sit there for about a 8-10 weeks to equalize. I wanted the moisture levels to equalize under pressure. Well that is/was my hope. 


PIC 4- OUT OF VACUUM BAG 

Out of the vacuum bag and it looks great. The outside has a shellac finish and feels good to the touch. Contrast picture 2 with 4 and you will see a huge difference. In pic 2 the outside crust is somewhat soft but in pic 4 the outside took on a mahogany shellac finish. Well worth vacuum sealing and waiting 3 weeks. 


REVIEW- Final pictures below.  Perfect!!! It took a year to figure out and it was worth it. The only thing I would change is to add just a little bit more garlic..... maybe .25%-.50% increase. 


Basturma, Myzithra cheese, toasted pine nuts, Lemon and sage and sweet onion infused olive oil. 


UPDATE- 12/15/2016


Below are my gratuitous pictures of my latest Basturma. It came out great if I do say so myself. I dried the Basturma exactly to 30%. The first one I did was dried ever-so slightly above 35%. I think the 30% version was way better than the 35% one. When I make the Basturma again (should be soon) I will change the drying percentage to about 32.5% which I think will bring it closer to perfection. We will see.... Also in the first Basturma the moisture levels equalized over over 3 weeks but on this one I waited a whole 6 weeks. Well Worth the wait!!! Moisture levels were perfect through the whole loin.