

What inspired me to make another Jerky? I had eaten some Asian food the other night so while sleeping and dreaming of food of course (normal for me) I came up with this new crazy concoction. And I love to make Jerky too. Coming up with different flavors is lots of fun.
Food Safety is also important too. Click HERE if you want to learn how to make Jerky the safe way. I have several more recipes HERE too.
Sometimes I have a urge to make Jerky but the quality of the Top-Round (London Broil) sitting there in the food case is sub-par so my inspiration quickly disappears. I'm always on the look out for minimal connective tissues and fat.


Today I got lucky!!!! Almost 9 lbs of Top-Round!!!!


As you can see there's not much fat and what is there will be trimmed up. The picture to the right is the meat sitting in the freezer. I will flip them several times until they are semi frozen. Partially frozen meat is easier to trim and slice


The meat was sliced on my Berkel at 3/8 of an inch.

 I'll admit some of the ingredients are unique. Why Cure # 1? I like the taste and as an added bonus it provides some extra level of safety against botulism. It also helps with Beef Fat. Hard to explain but Beef fat can go rancid pretty fast and Cure # 1 prevents this. Galangal powder might be new to you too. It's an amazing ingredient and a must try. The fresh stuff is amazing. I first came across Galangal in a marvelous soup at a Thai restaurant. Very similar to ginger. The picture to the right is that of a Chinese Long Pepper!!! It's very pungent and a must. Use your spice mill to grind these babies up as well as the sesame seeds. Don't use sesame seed oil in place of the seeds. I have tried sesame seed oil in my Jerky's before and did not like the oily feel.
 How to use Cure # 1 with Jerky? Click HERE! It's very simple though. Weigh everything and make sure to use grams. If the meat and marinade weighed 9 lb. I would convert 9 lb. to grams which is 4082 grams. You would multiply 4082 X .25% (.0025) = 10.25 grams... You would need 10.25 grams of Cure #1. If you want a huge amount of detail click the link above.


Whip up the sauce and pour it over the meat. Massage the meat making sure it is completely covered and submerged. I elevated the meat a bit to take a photo. After 2-3 days of curing the Jerky will be ready to be dehydrated. I will turn it over once or twice before I dehydrate the Jerky. I would suggest wearing Food Grade gloves while handling. One last thing I want to mention before moving on. This recipe is hodgepodge of ingredients so I would suggest sampling as you build the sauce. You might want to add this or that or completely change things up.

Prepping the Jerky for the dehydrator is easy. Lay out your trays/screens and as an option sprinkle on just a touch of Garlic, And if you really one to kick it up add some Cayenne (I did not... kids will not like this), Some Black and White Sesame Seeds and finally dehydrated Chives. And if you want to get creative add additional stuff. Maybe some dehydrated pineapple powder if you want to increase that flavor.

These stainless steel racks are 15" X 15" and they told a lot of meat. Here are 8 of them. My unit can hold 10 trays. I would suggest buying a good dehydrator from Excalibur!!! I purchased the Excalibur 10 tray version.
Now it's up to to determine what times and temps are appropriate. Every-time I make Jerky the times vary. I always start to with 135 f for about 2 hours and drop it down to 110 f for a few more, than finish at 95-100 depending on texture. If you can bend the Jerky and the fibers just start to split apart it's all done. This part is very subjective and is based on personal preference. I like softer Jerky that won't break my teeth. After the dehydration process I will SV to pasteurize.
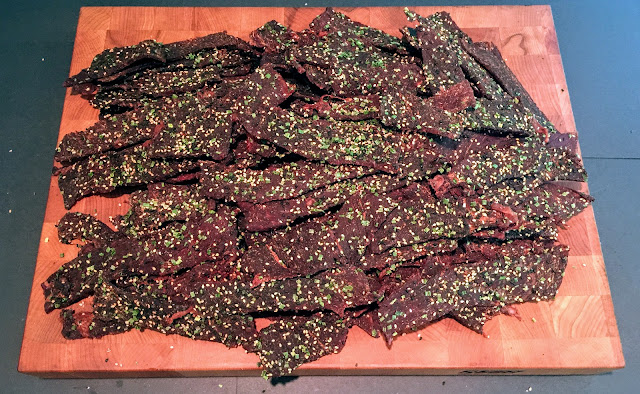
ALL DONE- This Jerky came out amazing. This is a work of art. This will go down as one of my favorites. One of the best Jerky's I've ever made. I can see using this marinade on some chicken with tweak or to.


 TOP OF THE PAGE

Prepping the Jerky for the dehydrator is easy. Lay out your trays/screens and as an option sprinkle on just a touch of Garlic, And if you really one to kick it up add some Cayenne (I did not... kids will not like this), Some Black and White Sesame Seeds and finally dehydrated Chives. And if you want to get creative add additional stuff. Maybe some dehydrated pineapple powder if you want to increase that flavor.

These stainless steel racks are 15" X 15" and they told a lot of meat. Here are 8 of them. My unit can hold 10 trays. I would suggest buying a good dehydrator from Excalibur!!! I purchased the Excalibur 10 tray version.
Now it's up to to determine what times and temps are appropriate. Every-time I make Jerky the times vary. I always start to with 135 f for about 2 hours and drop it down to 110 f for a few more, than finish at 95-100 depending on texture. If you can bend the Jerky and the fibers just start to split apart it's all done. This part is very subjective and is based on personal preference. I like softer Jerky that won't break my teeth. After the dehydration process I will SV to pasteurize.
ALL DONE- This Jerky came out amazing. This is a work of art. This will go down as one of my favorites. One of the best Jerky's I've ever made. I can see using this marinade on some chicken with tweak or to.


